Git for Mathematicians (2): The Theory
- Published
- Published .
This post is the second in a series in which I will try to explain how to use Git to write papers, with an audience of professional mathematicians in mind. Let us now dive into the second part, in which I explain a little what’s going “under the hood” of Git.
While it is not strictly necessary to know all this to use Git, I think that understanding the mechanics helps in actually using it correctly and efficiently.
Commands like git push or git pull are actually a bit complex and it is useful to know what words like “commit”, “branch”, “remote”, etc. refer to, especially when there is a conflict between branches.
Note
Of course, I will not be able to explain everything about Git’s inner workings! That is what the reference documentation is for.
Commits
Since this post is intended for mathematicians, I hope that I can get away with some mathematical terminology. For a typical Git repository whose branches share a common beginning, the history can be modeled as a rooted directed graph without directed cycles, together with named pointers to some of its vertices. Quite a mouthful, isn’t it? Let me try to explain what this all means.
Git can represent more exotic repositories with several unrelated roots, but the single-root case covers ordinary work on an article.
-
The history is a graph. Its vertices are called the commits. A commit represents a state of the repository, i.e., what the contents of all tracked files were at that point in history. It is a snapshot, not merely a list of edits. This is what you see if you type
git login a repository; Part 3b gives a concrete example. Moreover, every commit has some metadata associated with it:- Its author, which is the user that made the modifications in the commit. (There is also a committer, which is the user who actually committed the changes in the repository; the two are typically one and the same, but not always.)
- Author and committer dates.
- A message, written by the author, which summarizes the commit. This is typically used to explain what changed in the commit.
-
So far, I have only described the vertices of the graph. There is an additional piece of metadata that actually makes the history into a graph: the parent commit or commits. These identify the point or points in history from which the new snapshot was made. A typical history of a single-author Git repository could look like this:

(If only writing a paper took four tries!) This relation is asymmetrical: one commit is identified as the parent, and one is identified as the child. This makes the graph into a directed graph. An edge of the graph can be visualized as the changes from one commit to the next, although Git stores the snapshots themselves. You can inspect such an edge with
git diff PARENT CHILD, or inspect a commit and its change withgit show COMMIT. It’s not possible to create a loop in the history, so this graph has no directed cycles. -
Everything has to start somewhere. There is one special commit that has no parent, the initial commit (the root, in mathematical terms). This commit is the beginning of the history of the repository. It simply represents the first time that files have been committed to the repository. In the diagram above, the initial commit is drawn with a red outline.
-
So far, what I have described is a rooted tree: the history starts somewhere, then users commit files and changes starting from somewhere. As soon as two or more people start working on the same repository (or the same person from different computers), the history can split in two or more directions. For example, authors A and B could start working from a common basis, author A makes some changes to Section 2, and author B makes some changes to Section 3 (or Section 2!). This could look like this (blue is author A, yellow is author B):
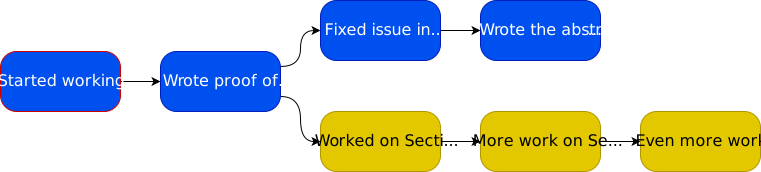
At some point, the two sets of changes need to be reconciled. In Git parlance, this is called merging. Special commits called merge commits can have two parents or more. (I say special, but this is a commit like any other, so it has an author, a date, etc.) After such a commit, the history looks like this:

If all goes well (i.e., there are no conflicting changes) then Git is able to automatically reconcile the changes. In that case, Git creates the merged snapshot automatically. Like every commit, the merge commit contains a complete snapshot; what distinguishes it is that it has multiple parents. Otherwise, there is what is called a merge conflict, which needs to be resolved manually. This can sound intimidating, but Git helps you through the process. If you were writing the paper in the old-school way and two authors made conflicting changes to the file at the same time, you would still have to reconcile them—without Git pointing out where they overlap. Git at least gives you a heads up, prevents you from blindly overwriting your coauthor’s changes, and tells you exactly where the issue is. Part 3b shows the process concretely.
From the contents and metadata of a commit, Git computes a commit ID.
Most repositories use an SHA-1 hash, which looks like this: 4303a91e4e4f5fedceead0d4dfe939471451e65d.
Git also supports repositories that use SHA-256, whose IDs are longer.
These commit IDs depend on the snapshot, message, author and committer information, and parent commits; the parent IDs in turn depend on their own history.
A reference to a commit thus depends on the whole history of the repository up to that point.
This is useful to note because some commands can rewrite history: changing a commit changes its ID and the IDs of all descendant commits, but unrelated commits keep their IDs.
Staging
Alright, now we know what the history of a Git repository looks like. But in practice, how does one append a new snapshot to that history?
In addition to the history (which contains the commits), Git has a notion called the “staging area”, also called the index. As you modify files in a repository, your working files will diverge from what Git considers to be the latest version of the repository. Before actually committing a new snapshot to the history, you normally explicitly “stage” the file contents you want it to contain. Once the index has the intended contents, you create a commit whose parent is normally the previous commit, with a message that explains the change. The initial commit is the exception: it has no parent. A typical workflow looks like this:
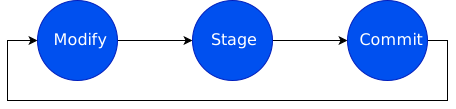
This notion of staging is useful for various reasons, compared to blindly committing everything that’s changed in your repository:
- You may have modified many different files but you may not want to commit them just yet, as you don’t consider these changes to be done.
- It is in fact possible to choose individual lines of a file to be committed. This can be useful if, for example, you are happy with the changes you’ve made to Section 2, forgot to commit, started working on Section 3, then remembered to commit (“save”) but you don’t want to commit Section 3 yet.
- You may also want to group changes logically. For example, if you have modified five files, but two of them are related to one change and three to another change, then it makes sense to make two different commits. In that case, you don’t have to commit as soon as you want to group a set of changes together: you can group them after the fact.
- You may not want to include every file in the Git history.
For example, it is generally not useful to include LaTeX’s
.auxfiles or the compiled article PDF: they can be recreated, and their binary changes are not informative. Be more careful with a blanket rule such as*.pdf, however, because it would also ignore PDF figures that are genuine source material. In that case, you would simply not commit the files that you don’t want to record.
Git has some features that help you with this:
- If you do not care about grouping changes logically,
git commit -acan stage and commit modifications and deletions of files that Git already tracks in one fell swoop. It does not include new, untracked files. - You can also tell Git to ignore some files (e.g. the PDF).
Git will not normally offer to stage ignored, untracked files, and commands such as
git add .will skip them. Adding a path to.gitignoredoes not stop tracking it if it was already committed.
Pointers
Branches
As we saw before, the history of a Git repository can get pretty complicated. The “latest version” can be difficult to determine: in the image with the forked history (before the merge commit), is the “latest version” the commit labeled “More work on Section 2”, or the one “Even more work on Section 3”?
Another (more “advanced” but related) situation is when you want to start working on a file without disturbing what is considered the “main” version of the paper. For example, you may have an idea for a new proof of Proposition 3, and you want to start rewriting it, but you may want to be able to easily go back to the “main” version. Moreover, while you are going off on your tangent, you may also want to make changes to the “main” version of the paper and immediately make them available to your coauthors.
Branches are a solution to these questions.
A branch is merely a named pointer to a specific commit.
Nothing more, nothing less.
A repository typically starts with a single branch.
Its name depends on your configuration and hosting service; main is now common, while many older repositories use master.
The name has no special meaning to Git.
Whenever you commit something to Git, you are actually doing two things:
- you commit the staged changes to the history, creating a new “point in time” with all its associated metadata;
- Git normally moves the pointer of the current branch to that new point in time.
The qualifier “normally” covers an advanced situation called a detached HEAD, in which no branch is currently checked out.
For example, in the first image, the main branch was pointing to “Started working on the paper” at first.
Then as more commits were added, it moved to the right each time, until it pointed to “Posted to arXiv”, which I drew in green to indicate that it was the commit referenced by the main branch.
In the second image, instead of imagining that two authors have been working on the paper, it’s possible to imagine that a single author has been working with two different branches. One can imagine that the story went this way:
- The author wrote the two commits “Started working on the paper” and “Wrote proof of Proposition 3”.
- Then, the author had an idea for Section 3, but wasn’t sure that the idea would make its way to the final version of the paper.
The author thus decided to create a new branch, named for example
super-idea, and wrote the commit “Worked on Section 3”. At that point, themainbranch still points to “Wrote proof of Proposition 3”, butsuper-ideapoints to the new commit. - Then, the author notices an important issue that requires immediate fixing in Section 2.
The author switches back to
main, commits the fix, and calls it “Worked on Section 2”. Some time later, the author commits “More work on Section 2”. - After some more time, the author decides to start working again on Section 3.
She switches back to
super-ideaand commits “More work on Section 3”, then “Even more work on Section 3”. - At this point, the history looks like the second image.
The author has a choice:
- Either she’s happy with the changes to Section 3 and decides to merge the changes into the main branch (taking care of conflicts if any).
She calls the appropriate Git command and creates a new commit, called “Merge!” in the third image.
The
mainbranch now points to this merge commit. Thesuper-ideabranch has become unnecessary: the whole history of the branch is now part of the history of themainbranch. She can now safely delete it, or keep it around for sentimental reasons. - Or she decides that the changes to Section 3 were not worth it and keeps the
mainbranch as it is. She can delete thesuper-ideabranch. The yellow commits will no longer be reachable from any branch, although Git normally retains them for a while through its recovery logs before eventually pruning them. Or she can keep the branch around, in case a later idea allows the changes to be reincorporated into the article, but continue working on themainbranch in the meantime.
- Either she’s happy with the changes to Section 3 and decides to merge the changes into the main branch (taking care of conflicts if any).
She calls the appropriate Git command and creates a new commit, called “Merge!” in the third image.
The
For a concrete example, this is exactly what I did while writing this post.
I created a branch (unimaginatively) called git2 and started writing the post.
But while writing it, I noticed that I forgot to call the FontAwesome script asynchronously.
I switched back to the main website branch and committed my change there.
This allowed me to immediately change my website without putting an incomplete article online.
Then, when I was done with this article, I merged the git2 branch into the main branch.
Git was smart enough to notice that there was no conflict: the header file that I modified for the script was not modified as part of this article.
Thus, Git merged the two lines of work gracefully.
Remark
There is another kind of named reference called a tag.
Tags live separately from branches and are normally treated as immutable: when you make new commits, a tag stays where it is.
A lightweight tag is just a name, while an annotated tag can also contain a message, author, and date.
This is useful to keep track of special points of history.
For articles, I have found it useful to create tags such as arxiv-v1, arxiv-v2, etc. for versions submitted to arXiv, and submitted-v1, submitted-v2, etc. for versions submitted to a journal.
Remotes
You may have noticed something while reading the previous section.
Suppose that two authors are working on the same article.
Let’s say that they start from the same commit (for example, they copied the files around).
Then they start working on the article and committing changes to the main branch.
At this point, the two authors both have a branch called main, but they refer to different things!
How can they be reconciled?
This is where remotes come in.
Remember when I said in the first post that Git is distributed?
A remote is a short name in your local configuration for another copy of the repository that you can access, typically through the network.
The conventional name for the first remote is origin.
Git also keeps local, read-only pointers such as origin/main, called remote-tracking branches, which record where the remote’s branches pointed the last time you communicated with it.
You can essentially do two things with a remote:
-
You can pull changes. This command is actually a combination of two different steps:
- First, you fetch the commits from the remote. Git adds objects it does not already have to its database and updates its remote-tracking branches.
- Then, Git integrates the selected remote branch into your current local branch. This may be a simple fast-forward, a merge, or a rebase, depending on the histories and the option or configuration you choose.
A fast-forward is automatic. If the histories have diverged, Git requires you to choose how to reconcile them; Part 3b gives a merge-based workflow.
-
You can push changes. This sends your local objects to the remote and asks it to update one of its branches:
- First, you send your commits to the remote, which adds it to its own database of commits.
- Then, you ask the remote to move its branch pointer to the new commit.
The remote will normally refuse if that move would discard commits that are already there—for example, because a coauthor pushed first.
If the remote accepts that update, its branch now points to the same commit as yours.
This is illustrated in the following diagram:
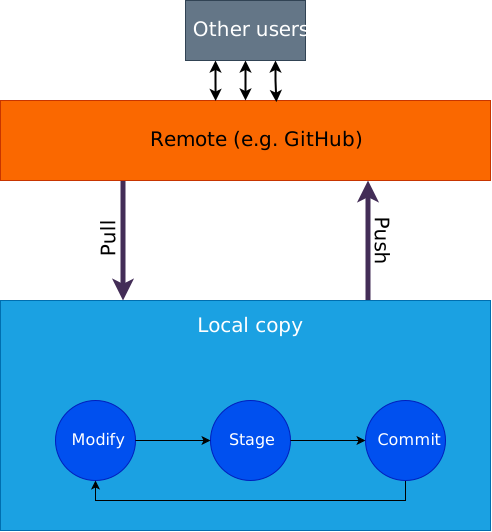
Now, what’s a good choice for a remote? Strictly speaking, a remote doesn’t have to be a central server that all your collaborators work with. You could work on your local copy of the repository, then you could meet with your collaborator and exchange commits and merge branches using some flash drive or whatever. As I said, a remote is nothing special: it’s just another copy of the repository.
This is, however, highly impractical. In general, one does work with a central server such as GitHub, GitLab, or Bitbucket. Everyone agrees to push to and pull from that always-available server.
Wrapping up
Alright, I hope this helps you understand how Git works. The practical continuation is now available in two parts: setup and initialization, followed by the daily workflow and collaboration. There are also excellent resources online, such as the Pro Git Book.
As you may know, this entire website is hosted in a Git repository on GitHub. If you see anything wrong above, please raise an issue there 🙂.